Done! Rendering with Atlux λ is this easy, just one click and you got it!
No need to create any Level Sequence or work with the Movie Render Queue. Everything is automated.
PLUGIN CONTENT
UE Editor Mode
Keyboard shortcuts and Placement Mode for an easier shot setup.
Camera Selection Key
Press the Tab on the keyboard to select and cycle through all the cameras in the scene. Pressing Ctrl + Shift + P (Pilot) will frame the current camera in the viewport.
Target Selection Key
Press Ctrl + Tab on the keyboard to select and cycle through all the targets in the scene
Light Selection Key
Press Shift + Tab on the keyboard to select and cycle through all the lights in the scene
Placement Mode
With any Atlux λ asset selected, press Spacebar on the keyboard to go into Placement Mode. The asset will move to the position of your cursor as you move it and can be controlled further with the mouse wheel and the keyboard.
Light Painting
Similar to Placement Mode, enabled when dragging a new light from Atlux λ's interface or pressing Spacebar when a light is selected.
Placement Mode Controls
Placement Mode is automatically access when dragging a new asset from Atlux λ's interface. It can also be accessed from any existing asset in the scene, including default assets and your own meshes, by selecting the asset and pressing Spacebar.
Asset Manipulation
- Move Asset: The asset will move to the position of the cursor as you move it on the scene
- Asset Distance: The Mouse wheel moves the asset further or closer to the cursor position. This means up and down if the cursor is on the ground/floor
- Scale Asset: Up and Down keys, Shift + Mouse Wheel (scale up and down)
Cameras
- Move Asset and Asset Distance: Same as the default Asset Manipulation.
- Adjust Focal Length: Up and Down keys, Shift + Mouse Wheel (increase and decrease focal length)
Light Painting Controls
Light Painting is similar to Placement Mode, but specific for lights. It's automatically access when dragging a new light from Atlux λ's interface. It can also be accessed from any existing light in the scene by selecting the light and pressing Spacebar.
Move Light
- Light Placement: The light will move to the position of the cursor as you move it on the scene. If the cursor is on top of a 3D model, it will automatically move the light to the position where it will light up the part of the model where the cursor is.
- Light Distance: The Mouse wheel moves the light further or closer to the surface on the cursor position. This means up and down if the cursor is on the ground/floor.
Light Intensity
- Alt + Mouse Wheel (up and down to increase or decrease intensity).
Scale Light
- Up and Down keys, Shift + Mouse Wheel (scale up and down).
Assets, presets, quick functions, easy render settings and a 1-click render button.
Below on the left is a representation of Atlux λ's interface inside Unreal Engine.
Scroll down to go through all the sections.
Studio
Lighting
Sequence
Render
This is a representation of Atlux λ's interface within Unreal Engine.
Cameras to Render: 1
Frames: 1
Sequence: Default
Use Batch
Shoot
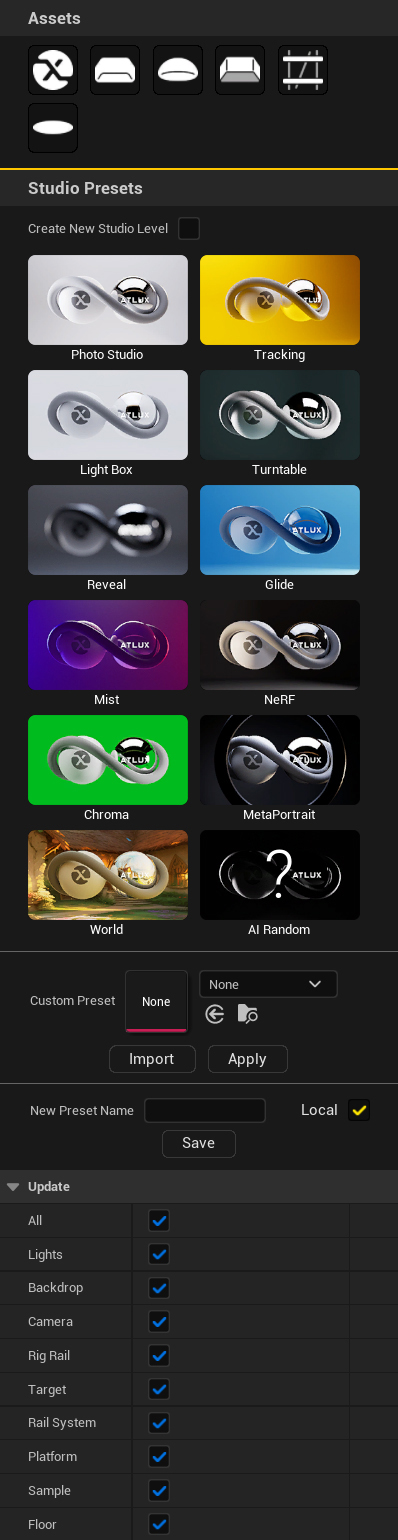
Studio
Assets and presets to create your own visualization studio, including a standard Photo Studio, a NeRF Maker, even an AI-powered studio generator.
Assets
Studio
Actor that contains the information about the studio and interacts with the interface to apply presets and organise the folders inside it.
Backdrop - Cyclorama
Backdrop of type Cyclorama, with options to change colors, materials, reflections and also swap to other types of Backdrop
Backdrop - Dome
Backdrop of type Dome, with options to apply a 360/HDRI image to it, and also swap to other types of Backdrop
Backdrop - Room
Backdrop of type Room, with options to change colors, materials, reflections and also swap to other types of Backdrop
Ceiling Rail System
Wooden beams with rails and runners so that the softboxes can hang from it. It is interactive and updates automatically when lights are moved.
Platform
Actor to contain the models to render. It has options for turntable and floating platform. If Transparent Background is enabled, the actors inside this platform will have their own layer in the render output.
Studio Presets
12 different Studio presets, including the standard Photo Studio, stuidios with animation presets, a MetaHuman portrait, a NeRF/3D scan maker, even an AI-powered studio generator.
Photo Studio
Standard Studio with a cyclorama, a ceiling rail system, and the standard Camera + Target.
Tracking
Dome Studio with a Camera Rig Rail
Light Box
Compact Studio with one overhead light
Turntable
Studio with a Turntable Platform
Reveal
Studio with Rails on the Target and the Overhead Light
Glide
Studio with Rollercoaster Camera Rail plus Floating Platform
Mist
Studio with Fog enabled in the Backdrop
NeRF
Studio with 3 Cameras on Circular Rails perfect for NeRF, Gaussian Splatting or Photogrammetry creation.
Chroma
Studio with a flat (unlit) green background
MetaPortrait
Studio with a ring light for MetaHumans and other characters
World
Dome Studio with a 360 shader. Inside the material the texture can be swapped, and "Camera Projection" can be enabled for an inmersive feeling. The texture can be changed to any HDRI or equirectangular image.
AI Random
Generates a random studio using AI technology. The quality of the random studios will improve over time.
Custom Preset
Save/Load your own. Save any studio you create and load it back whenever you want, from any project. You can also import a studio directly from an Atlux Render Log file.
Update
You can choose what you want to load from a preset. Everything, or just the lights, the backdrop, the camera, etc. This is helpful if you want to maintain your current Camera and Target and only change the rest of the studio.
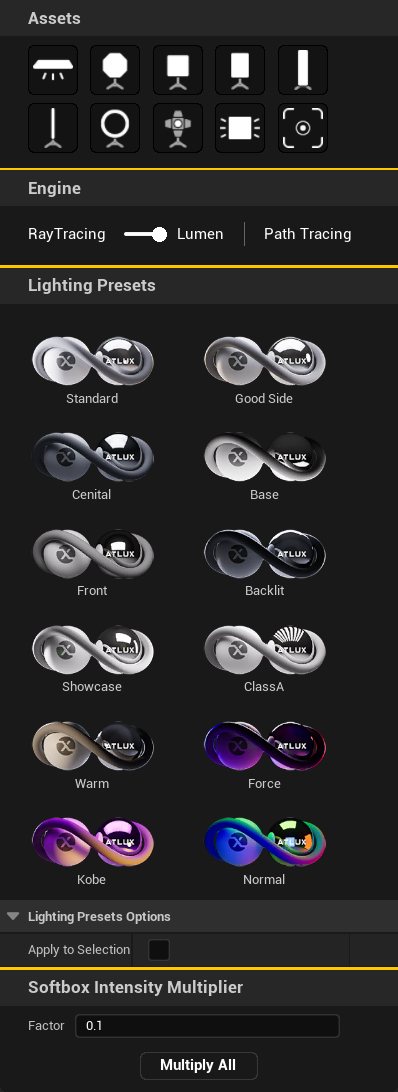
Lighting
Assets and presets to make professional lighting as quick as it gets.
Assets
Overhead Lightbank
Softbox 70x70 Octagonal
Softbox 60x60
Softbox 50x70
Softbox 30x120
Light Wand
Ring Light
Spotlight
Area Light
Target
Engine
Switch to easily swap between Raytracing (default) and Lumen. Also a direct shortcut to Path tracing in the viewport.
Lighting Presets
12 different Lighting presets - this won't modify the studio, only the lighting, and can be used also for other scenes/levels without studio.
Standard
Good Side
Cenital
Base
Front
Backlit
Showcase
ClassA
Warm
Force
Kobe
Normal
Softbox Intensity Multiplier
Easily modify the intensity of all the lights in a scene. This is handy to adapt lights to emissive materials and other lights in the level.
+ Light Painting
Dragging lights from the Assets directly on top of a 3D model will place them where they affect the part of the 3D model where the cursor is. This placement mode can also be accessed from any selected light by pressing Spacebar.
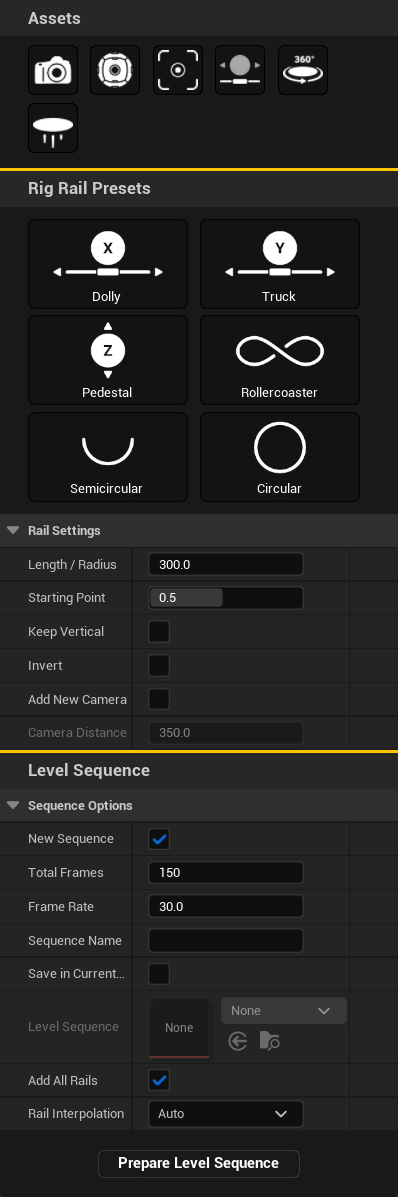
Sequence
Assets and presets to create your own visualization studio, including a standard Photo Studio, a NeRF Maker, even an AI-powered studio generator.
Assets
DSLR Camera
360 Camera
Target
Rig Rail
Turntable
Floating Platform
Rig Rail Presets
Preset rail animations, perfect for Cameras and Lights. The animation is created automatically when rendering, no need to modify any Level Sequence.
Dolly
Rail to move the Camera or any other object forwards and backwards.
Truck
Rail to move the Camera or any other object from side to side.
Pedestal
Rail to move the Camera or any other object up and down.
Rollercoaster
Perfect for a camera animation around a main object.
Semicircular
Rail to move the Camera or any other object 180 degrees around a target.
Circular
Rail to move the Camera or any other object 360 degrees around a target.
Rail Settings
Directly control the length, the orientation, the starting point and direction of the rail presets. You can also create a new DSLR Camera with it.
Level Sequence
Automatic Level Sequence creation including camera and rails in case you want to modify manually the animation. This is not needed as rendering straight from Atlux λ's interface already creates automatically a Level Sequence with the animation inside, but it's handy if you want to customise parts of it.
Render
Easy render settings, with options for transparent background, cryptomatte, render passes and more! Plus a 1-click render button - Shoot!. Also Batch rendering options. No need to create Level Sequences or using the Movie Render Queue. Everything is automated. It can be used on any project and level, even without an Atlux λ studio.
Quality Presets
Preset render settings for quality and resolution. All render settings can still be modified manually after applying the preset.
Quick
Base Renderer, Medium Quality, 720p, Denoiser.
Real
Path Tracer, Ultra Quality, 1080p, No Denoiser.
Production
Path Tracer, Apex Quality, 4K, No Denoiser, Saves Render Log. Very heavy on the Graphics Card.
Output Presets
Preset render settings for durations and frame rate. All render settings can still be modified manually after applying the preset.
Single Shot
Defaults to 1 singel frame.
Sequence
150 frames, 30fps, Motion Blur.
Custom Render Settings
Save the current settings, and load the any time. You can also load render settings straight from an Atlux λ's Render Log file to take the same settings as a previous render. Rest option also to get all the settings back to default.
Render Settings
Fully control all render settings in an easy way from the simplified interface.
Sequence
- Total frames (duration).
- Frame Rate.
File output
- Output Path: Defaults to a newly created Render folder inside your project.
- Render Title: add it to the name of the file.
- Naming convention: add or remove elements (date, time, title, batch name, etc).
- Resolution: Image size with presets for 1080p, 4K, Reels, Square and more
Render
- Quality: Pre-built quality settings.
- Base Renderer: Usually what the viewport looks like. It can be rendered using Raytracing or Lumen (as specified in the Lighting tab). Both Base Renderer and Path Tracing can be rendered at the same time giving 2 different images in one single render.
- Path Tracing Renderer: Renders the image using Path Tracer (usually more realistic but also more graphics demanding). Both Base Renderer and Path Tracing can be rendered at the same time giving 2 different images in one single render.
File Format
Options for output format. Multiple formats can be used in the same render giving multiple outputs. EXR is a multi-layer 32-bit file. MOV only works on Windows and the Apple ProRes Media needs to be enabled in the Plugins of the project ()ships by default with Unreal Engine).
Other Options
- Denoiser: Applies or remove denoising to the output.
- Motion Blur: Applies Motion Blur to the render. When disabled, the rendering window might look like it freezes on the first frame but it's actually rendering fine.
- Warm Up Count: Add warm-up renders at the beginning of the sequence that don't get render in the final output. Ideal to build up particle systems and animations.
- System: Options to automatically open the output folder when the render is finished, and to Save Render Log which creates a .atlux file with the same name as the render and contains all the information of the render - render time, system information, studio structure and render settings. It can be used to load directly render settings and studio presets.
Render Passes
- Transparent Background: Creates and alpha layer in the image selecting the models inside the Platform actor or the Models folder. It also separates automatically the Backdrop.
- Cryptomatte: Creates multiple alpha layers per actor, per material, or per mesh.
- Shadow Pass: Creates a Shadow render pass, ideal to work with Transparent Background.
- AOVs / Render Passes: Renders individual passes like Base Color, Metallic, Specular, Roughness, World Normal, etc... Ideal for post-production.
Custom
- Custom Render Settings: Load Render Settings from Unreal Engine's Movie Render Queue.
- Custom Level Sequence: Add a custom level sequence to the render, ideal for complex animations and custom sequences.
Batch
Automatically render multiple models, or the same model with multiple lightings. It also has options to override different materials in each render.
Stager
The different combinations of models, materials and studio/lighting presets to render
Batch Options
- Add Loaded Items: Automatically add the selected assets in the Content Browser to the Stager array.
- Snap Models to Floor: Automatically move the batch models in the scene so they touch the ground. This is ideal if each mode has a different origin of coordinates.
- Auto Frame Camera: Automatically frames the camera to see the entire batch model. Ideal if the different models have noticibly different sizes.
- Frame Ratio: Defines the percetange of empty space around the model in the image when Auto Frame Camera is enabled.
Update
Choose what to update from the studio in each render of the batch.
Render Footer
Gives information about the current cameras selected to render, the number of frames selected, the custom sequence selected if there is one, and whether or not enable the batch rendering.
Shoot!
1-click render button. No need to set anything up, simply click Shoot and the render starts! In any scene, with or without studio, even with default UE's cameras.